Showing posts with label blog. Show all posts

Thursday, May 19, 2022

Look who's doing a podcast!

Way back before COVID really kicked in my mate Moo, aka Miss Krissi Marie,  and I thought we might like to create a podcast.  Yeah, like why the hell not!   We crack ourselves up everytime we get together... so why not share that joy with all and sundry??!!?

The research began ..... exactly how one does create a podcast?   That, in itself, was an interesting learning curve.  We needed equipment, a space in which to record, software to record and edit on, web hosting, intro music, artwork and a list of subject to discuss.  Surely that wasn't too hard to sort!   A good friend Nate gifted us some equipment and basic info on how to use it,  I had a library that, with little alteration, became a suitable space in which to record, Moo researched and sourced appropriate software and taught herself to edit.  She also researched web hosting.  Nate, being an amazing musician accepted a commission from us for intro music and together we brainstormed a huge list of potential subjects.

So what was so hard???  Well two things really caught us offguard with their degree of difficulty!  A name for our chatfest and some sound editing issues that truely were beyond us, grew into major issues!

After a few days of back and forthing we created a short list of podcast names.  Much discussion followed and one name fitted our criteria, thus "Delusions of Grandeur Podcast" was born!  And so it began... we recorded our first podcast and thought we were awesome.... only to find sound production was ... lacklustre at best!  Dreadful would be a more apt description!!    Moo, known for her researching and problem solving skills tried EVERYTHING to get us sounding good.... all to no avail.   Fortunately thru my photography practice I had met and photographed a sound engineer known as "Mr Meat".  A gentle giant of a man with tremendous skill in his chosen field.   I organised a meet with Moo and Mr Meat and within a relatively short time frame he diagnosed our production issues and pointed Moo in the right direction.  Two pieces of equipment were purchased and suddenly we sounded great!!

With all the production issues under control Delusions of Grandeur has become a part of our weekly lives.  We record one night a week, Moo edits and we go live on all the regular places each Wednesday morning. 

So if you have about 30 minutes free each week and want to listen to us search on all the regular sites for the Delusion of Grandeur podcast or look us up on Insta or Facebook.  

Hopefully I'll put the right link here and not the one to our only fans site!!!   (joking, apparently we aren't on only fans... dunno why!!!).

Delusions of Grandeur

Sunday, April 3, 2022

Covid Craziness V1.0

Fair to say all of us endured many days and weeks in lockdown, myself included.  To say we all handled it differently would be the understatement of the year!  For me.... I'm classed as an essential worker, so I still headed to the office 9 days a fortnight. I live alone, so work provides me with social interaction that would be sadly lacking if I was working from home, or worse still, out of work.  So not a lot changed for me, other than work is busier than normal, and the cessation of social interaction outside of work.  From time to time I endured weekend lockdowns and it was the housebound part that has created some covid craziness!!  So many projects previous just passing thoughts were enacted, created and now, blogged about!

One such project was to create a terrarium!  I follow a gardener on Instagram and he makes some amazing terrariums, so I dug out some glassware and acquired some plants and.... well....  well I made 9, none of which I am perfectly happy with at this stage.  

Terrariums can be open or closed.  The glasswear I had was all lidded so closed terrariums it would be.

The concept is an old one.  In fact the oldest known surviving closed terrarium was created by a pommie called David Latimer.  He created one with a single cutting in 1960.  It remained sealed for 12 years  when, in 1972, it was opened and water was added.  It's still going now in 2022.  That is one old terrarium!!! I don't know if it has outlived David Latimer!

So my process was thus.... Into the washed bowl of the terrarium I layered black pebbles, horticultural charcoal, sphagnum moss, soaked and dripping and a final layer of succulent potting mix.  My plants were removed from their pots and popped into the succulent layer of medium.   By varying the depth of the medium hills and dales were easy to create so plants of similar height would appear different in the finished product.  

Wide mouth jars and bowls were the easiest to fill and plant out.  The hardest was a 5 litre old glass drink bottle. It was easy to funnel the growing medium in. Harder to create different levels and nearly impossible to get the plants well bedded into the succulent mix!  I used long handled tools and a couple of thin bamboo stakes, but it was not my best work.  I pulled 3 or 4 apart and remade them.  Too much succulent mix was a problem in the early attempts.  It is a case where less gives a better look. There is still plenty of room for root growth thru the layers.

Still unfilled are two 50 litre carboys.  Huge glass jars with very narrow necks.  Unfilled as I am not sure how to effectively create the hills and dales that make a good terrarium.  I will work it out and I will create the last two terrariums, but that, I feel, are enough.   Its not like outdoor gardening because if they are done correctly then need no future care....... well not for the first 12 years anyway!!!


Sunday, June 10, 2018

Home decorating 101.... by a NON expert!

Well much has transpired since my last post.  I'm now in full blown home reno mode.  I blame too much American daytime television for that!!     Fixer Upper, Good Bones, Flip or Flop.   I am amazed at the seemingly lack of governance in their reno regimes..... but perhaps those boring legal bits have been edited out for effect.   I'm not undertaking that level of work at this stage, but I am doing some decorating!   One of my jobs has been to create a functional office space. Having achieved that with a huge L shaped gloss white desk big enough for my editing computer and my smaller Family History and general laptops and some gloss white Ikea storage units, time has come to decorate the blank wall behind the desk.

The whole room was gutted and two coats of Taubmans was liberally applied.   My mate Moo was the paint buddy on that gig.   I did the patching, sanding and cleaning prep then she did all the cutting in while I rolled along behind here.     We did that on a stinking hot day so there was not a lot of time needed between coats!  And here we are 3 months later ready to create a gallery wall of images.   I purchased 11 black frames with white mattes.  Different sizes and formats, but the black and white theme was what I was after.   I then had 11 of my fave black and white images printed (oh there could be a whole blog post on that debarcle alone).   I finally framed them all.

As the frames were all different styles using old style wire and hanging hooks was just going to be a drama.   Moo suggested I try the 3M "Command" system of wall hooks.  Essentially they are sticky backed velcro.  Surprisingly they hold considerable weight.

I made paper templates the size of the prints and blu-tacked them to the wall.   This made it very easy to move images about and get the look I wanted.  I didn't want all the people pics on one side and the architectural images clumped together on the other side, so the templates worked a treat.

The process for hanging the system is to affix the velcro to the frame,  wash down the wall area where the sticky velcro will end up with rubbing alcohol.  Then remove the protective paper from the velcro and place the image where you want it.....and then..... instantly remove the image!!  That leaves one half of the velcro on the wall,  allowing it to cure for an hour before reattaching the print. 

Each stage of that process is fraught with problems.  Firstly all the frames had different widths on the reverse.  Fortunately the "Command" hooks come in varying sizes, so be cautious if you are embarking on this journey to match your frames with your hooks or, like me, you will be racing to Bunnings for more appropriate supplies!    The next problem was... hanging the images straight.  For this I used a Ryobi Air Grip Laser level.   Air grip, such a cute term for suction!    A mate at work loaned me two laser levels, but for them to be used "single handedly"  they needed to be affixed to the wall...with a nail!   Errr NO!  Not after all the cleaning and patching I had done!!   There are a number of different Laser levels out there and not knowing my arse from my elbow in this selection process I consulted he who shall be known as the "Oracle of Home Renovation".   Without hesitation he recommended the Ryobi.  He was right.  Suction was the answer.

So with all the good gear, good info and good intentions I began removing the templates and hanging the pics.    I started in the middle and worked out to the edges.   The "Command" hooks do leave a little wiggle room so fine tuning is an option.  And if you totally stuff up they can easily be removed and repositioned with a new wall mount piece (which can be bought separately).

The one negative I found was that one of the larger format frames I bought had perspex not glass and was scratched before I even got the print into it.  Lesson learnt,  Microfibre cleaning cloths and perspex don't go mix.   Its an easy fix though.  I'll have a sheet of 3mm glass cut for the frame and replace the perspex at some stage. 

Naturally I took progress images so you can follow the bouncing ball below if you need to.
I am chuffed at the look achieved for a minimal outlay.

Thanks must go to Moo, Joshy, The Oracle and Ash.  Job done! 


BLANK CANVAS

COMMANDER HOOKS, TEMPLATES AND OTHER ESSENTIALS

TEMPLATES IN PLACE

WIZZ BANG RYOBI LASER LEVELLER


ON ITS WAY WITH LASER IN PLACE

THE FINISHED PRODUCT!


Sunday, November 1, 2015

Hidden secrets

For the last 69 weeks I have been working from a 6 metre x 2.4 metre tin shed hidden away at the back of Belmont Court House whilst the 3 old buildings that constituted the Police Station were demolished.  Essentially is has been a work site where access was thru a tunnel built of scaffolding and marine ply.  It was hot is summer, cold in winter but it housed all I needed to do my job while the rest of the workforce were crammed into other Police Stations in the area.  You can fit a lot into a 6 x 2.4 shed!  3 desks, 3 computers, a printer/photocopier/fax, second printer, coffee machine, water cooler and a small, but perfectly functional LOUNGE!  At best I worked alone but on one single day we had 12 people in the shed at once. The most we ever had for a meal was 7.  I loved the shed as it housed exactly all I needed and had no room for "stuff" to grow.

The new police station is now complete. I call it the BIG tin shed.  It is fairly grand, but not exactly what we need space wise.  3 staff now share two workstations and two computers.... but it is early days and these things may change and evolve in time.

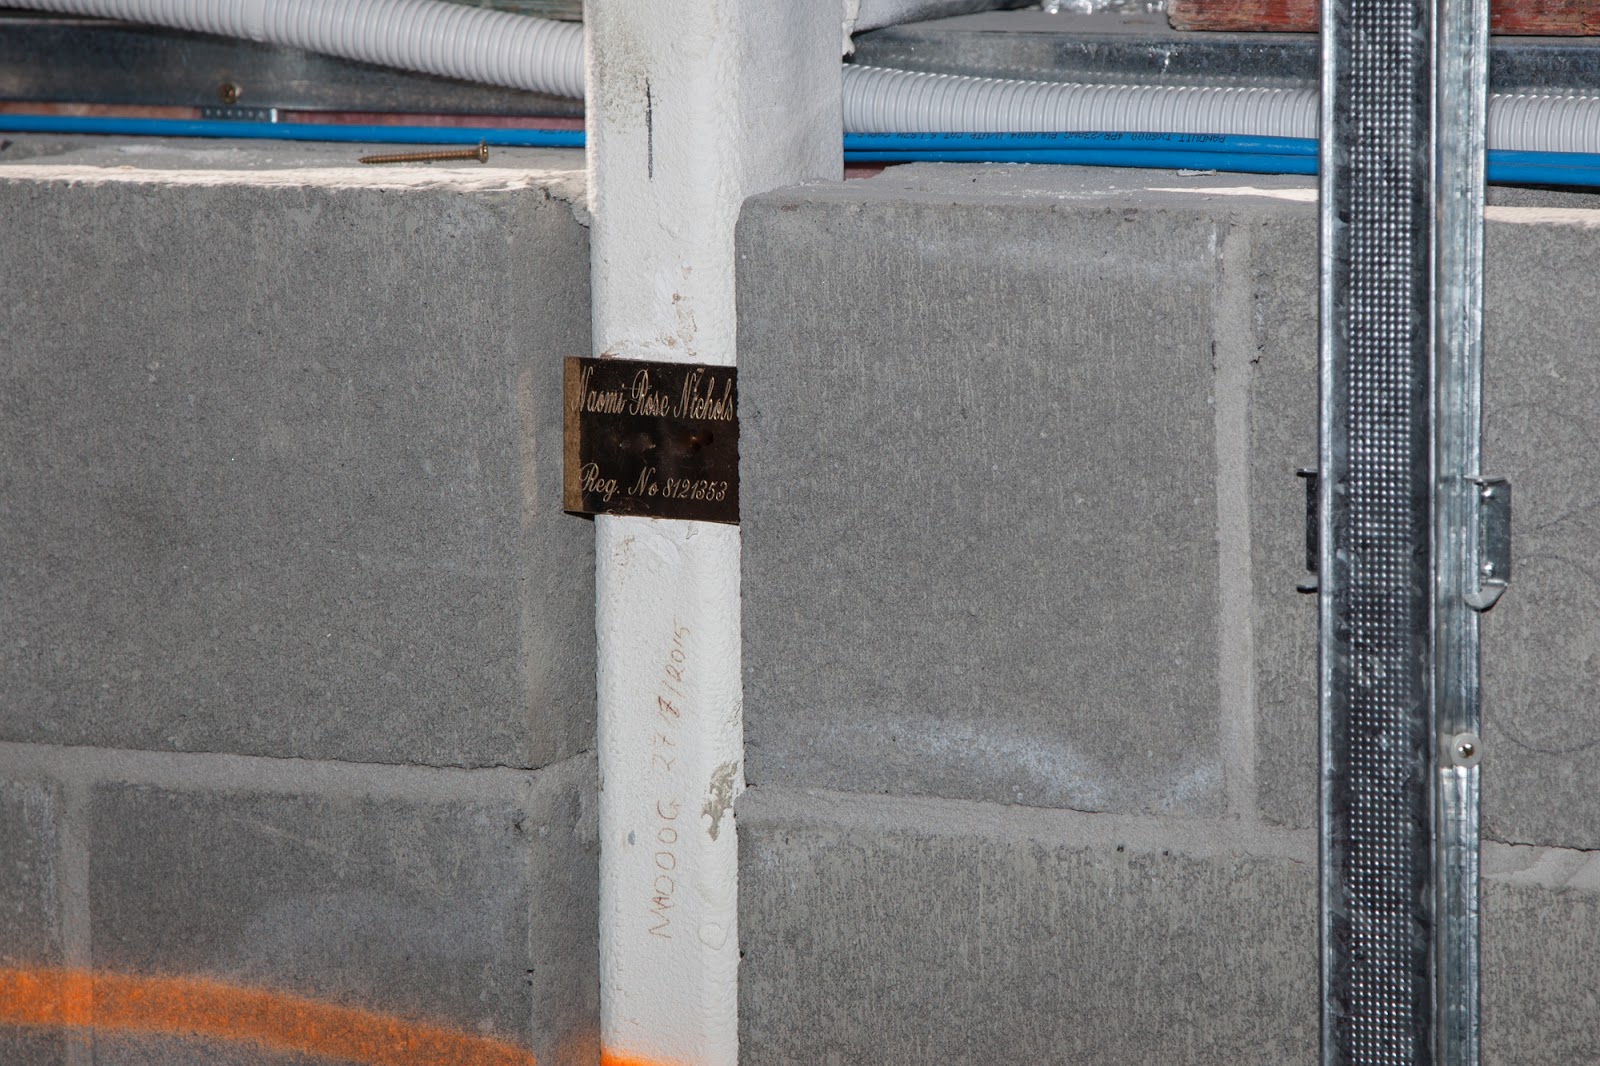
When the work first began on the new tin shed I mentioned to the Commander that it would be good to put a time capsule into the building. The old Police Station was built in 1964 and for more than half of its 50 years it was too small for its staff.  The Station prior to this one was on a  different site, up near the Fire Station opposite the Gunya Hotel and it had been in Belmont since the late 1800's.  So there was a lot of history that could be contained in a time capsule.  The Commander was enthusiastic and nominated a particular Inspector who could be in charge of a time capsule... and that's when I knew nothing would ever happen.   I waited to see if the idea ever surfaced again, but it didn't.   Demolition of the old station was complete, 11meters below street level dug out and huge concrete piles in situ I decided I wanted to have a little bit of me in the new building, after all I had worked in the one location since 1992!

Different ideas and thoughts came to me as to how to celebrate time but in the end I decided it was all going to be about me!  This new building is likely to survive 300 years so photos wouldn't last, a CD, DVD or USB would probably be unknown to someone in the year 2315.  Construction progressed quickly once the build was out of the ground and I needed to make the move or miss the opportunity forever.  So one sunday afternoon I went to the local shopping centre and had a small brass plaque engraved with my name, date of birth and work identity number.   I felt that was enough.  It didn't need flash or showy, just a memorial of sorts.

Back to the work site monday and I told 2 of the best tradies EVER about my idea.  We looked at the plans, worked out exactly where my new office would be and decided on a great little hiding spot.  I handed over the plaque and the rest was up to them.   Sometime later my phone beeped with a message.  Attached was a photo of the plaque in place!   Liquid nails oozing from behind it, perfect.   A couple of days later my phone beeped again.  One of these two fantastic blokes has tidied up the plaque.  Removed the excess liquid nails and polished her up a beauty!   It was to by gyprocked over sometime later that week.  Objective achieved!

The gyprocking took longer than expected and one day the Commander was doing a tour.  I had to fess up to one of the building managers about the plaque, but he too was a great guy and managed to steer the inspection team away from it!   Finally it was covered over and I could rest easy.  I didnt think anyone would kick up a stink over it.  I just didnt want to get my tradies into trouble!

I've had to take some leave and so I won't be sitting at my desk for some time, but I did go in yesterday to see my new office.  While I was there one of the tradies came in and said "oh.. this is our wall"  I had a giggle and was so happy that the plan had come together.

If the building is demolished n 300 years time it is most likely that the plaque will not  be found, but that is irrelevant.  That fact is it is in there now for the duration and just me and 2 fabulous tradies  know exactly where!

As usual we end with some pics.  There are some tradies and some "progress" shots!  I hope you enjoy!!!


The 6 x 2.4m ATCO shed in situ with the scaf and marine ply entry


Inside the tin shed


Plaque in place


Inside the BIG tin shed ... there may well be a plaque hidden away in here somewhere......


Protecting the anonymity of my partners in crime!

Saturday, September 5, 2015

Lights, lights and more lights

As you may have guessed I am a little bit obsessed with photography.  My interest was always macro, the world of tiny stuff, bits of things, not the whole, but then in got hooked on the 100 Strangers Project and I wanted to shoot people, people and more people.   While I was shooting strangers I was also shooting friends and I wanted to shoot more and more people .... with artificial light.

I have scads of equipment, lots, heaps and I even know how to use some of it!!!   My lenses are an even split between primes and zooms.  If I am shooting people I like primes, but for other stuff I usually have a zoom on.  As for lighting I have 4 flash heads, 2 soft boxes, 4 brollies and pocket wizards to trigger all this stuff, but after shooting a model earlier in the week I seriously want to move further up the food chain to strobes.  I know the gear I have can easily replicate the work I did with the strobes, but the one sole advantage the strobes have over my gear is a modelling light.  The modelling light provides me a better idea of what the final image will look like.  It shows where the shadows will fall and how two lights blend or don't blend as the case may be.

This sole advantage is the reason why I am seriously considering offloading all my lighting gear and donating a kidney to pay for some lights that give me shadows!!!  I know it is not really logical or valid or reasonable.... but it is not all about logic.  It's about wants, not needs!

Below are some images I have taken... the first three are in my lounge room with my current soft boxes,  flash heads and pocket wizards.  The second group are shot with strobes similar to those I want to go into huge debt for.  The difference.... I no longer know if I can tell!!

What is glaringly different is the backgrounds.  Lounge room verses studio.   That's my next big purchase I think!


Sunday, July 5, 2015

Urbex? Well maybe just vast interiors.

I love the idea of Urbex, Urban Exploration,  but my issue with Urbex is that I am just such a goodie two shoes that I can't agree with trespassing to get the shot.  I don't have an issue if others chose to do it (well I do have a bit of an issue) but it is their conscience that must be placated, not mine.   I do love vase interiors, unfinished projects and demolitions.

I have been very lucky to be allowed access to a number of structures that I really enjoyed a wander through.   Wangi Power Station was decommissioned years ago, but there is a plan to revamp it for housing.  It took a couple of years of wrangling to actually get inside the door and get a guided tour.  I have since been contacted by about 25 people telling me that want to break in and asking about security.  I tell them they won't set off the PIR's cos the guard dogs will eat them first!   Easier was the ask to get into the currently being constructed, Belmont Police Station. I totally understand why the owners of these places want to exclude people like me with cameras.  Morisset Hospital is another venue which has public access if you don't mind a bit of a walk in and in my local area there is an old ammunition dump  and an underground gun placement that are both open to the public.

I'm not sure what I like most about there forgotten and damaged places.  Maybe it is just seeing what remains.  A few have colourful graffiti, but I prefer them without.   With the new construction of Belmont Police Station it was the vast interiors that I really enjoyed.  Open, yet enclosed spaces.

All of these spaces can be dangerous to those are more interested in their cameras than where they are walking. It is important to be aware of your surroundings and not just what is happening in your viewfinder.   Staying safe is paramount.

As per usual here are a few pics.


                                                                Morisset Hospital


Gun placement 


Ammo Store


Wangi Power Station


Saturday, May 9, 2015

A Garden update.. the Autumn edition.


On the evening of 20 April Lake Macquarie and other parts of the east coast suffered some significant storms.  The high winds and torrential rain lasted for 3 days.  A lot of trees came down, a lot of property was damaged and a couple of people lost their lives.  I got off lightly.  The power was out for 36 hours and the phone ....  a whole lot longer, about 6 days!!! As a result there was a lot of damage in my veggie patch.  Some root veggies like carrots survived unscathed, but others, like ginger and garlic were awash.  I'm not sure if they will survive and prosper, only time will tell.  Above ground crops were badly affected.  All the corn was lost, an entire bed of it. Although it was planted late in the season and may not have been overly productive anyway.  I thought the broccoli was a goner, but it seems to have survived and the first heads are ready for harvest.  The silverbeet was lost, the spring onions flattened and the peas and beans and all their climbing framework was lost.

After the winds abated and the lawn began to dry out I cleaned out beds 1,3,6,7,9 and 10 and replanted with new seedlings.  20 silver beet, 4 mini cabbage, 8 brocollini, 8 cauliflower, 2 rhubarb, spring onions and a mix of different varieties of peas and beans.  There are still 4 beds unresolved.  Today the sun is out and bed number 11 is getting a makeover.  The basil in it was flattened, but has much young edible leaf.  It will have to go though and then the bed will be built up with a bag of moo poo, and a handful of troforte M, Searles 5 in 1, dynamic lifter, blood and bone and some lime for good measure.  I try to feed the soil, not the plant and it has worked for me so far... but I might be doing it very wrong.

I'm not sure what I might plant in bed 11.  Possibly more beans but it will be dependant on how the rest of the veggies are coming along and what is in stock at the nursery.  The yard needs a lot of work, there are two mid sized trees right down the back, both are harbouring dead limbs.  One assaulted me as I tried to remove it.... one is far to big for me to attempt.  Both might get a visit from Mr Nextdoors chainsaw later today if I see him!!!

Last Autumn white moth decimated my broccoli crop.  So I visited my local hardware and built a  frame of PVC covered curtain rods and plastic corner pieces that allowed me to drape mosquito netting over the frame and effectively exclude the moth.   This works well but the framing cost nearly $40.  A few weeks ago I saw flexible pvc coated metal rods that were 180cm long.  I bought 3 at the enormous amount of $2.80 each and they work in the same way.  They are only suitable for lower growing crops like cauliflower and cabbage, but work well to exclude the moth and uses less drapery in the process!  Still looking for the ideal solution, but I am moth free this season!

As usual, photos follow.


This is the set up with the 180cm bendy poles and mossie net.  Underneath is 4 drumhead cabbage and 8 broccolini I think the broccolini might grow too tall.


As the sign says!


Wish I could get more of these markers, they will last forever and are pretty groovy!


Snow peas, not my favourites, but I couldn't get any sugar snap ones. I usually plant peas and beans from seed, but after the storm took everything I used seedlings to speed up the process.


This time I used carrot tape as my last 3 attempts all failed. 


Pilchy, on guard duty!